Airplant (Bromeliads) basic Info. Tillandsia usneoides (Spanish Moss), Tillandsia caput medusae & Tillandisia xerograhica
I've been growing airplants for 2 years now but never took the time to look further into them. Since I've already made a couple of attempts in making appropriate ceramic planters for airplants I started searching for info. Firstly I wanted to identify the species that I have experience in and possibly learn more about their watering habits and positioning. My research taught me that I have been doing it wrong both with watering positioning of the plant. It was my understanding that the plant absorbs the water from the crown but apparently this might cause the plant to rot. Many more useful info. I guess I have to start collecting rain water for them...
https://www.rhs.org.uk/advice/profile?pid=971
https://en.wikipedia.org/wiki/Spanish_moss
https://en.wikipedia.org/wiki/Tillandsia_caput-medusae
https://en.wikipedia.org/wiki/Tillandsia_xerographica
https://www.airplantcity.com/
Air plants
Air plants (Tillandsia spp.) are from Mexico and South America. They are so-named because they use their short, wiry roots to attach themselves to branches, cliff-faces, even electricity and telephone lines, rather than rooting in soil.
Quick facts
Common name: Air plant
Botanical name: Tillandsia spp.
Group: Tropical epiphytes (growing on the branches or trunks of host trees without parasitizing them) or lithophytes (growing on rocks)
Flowering time: Spring to autumn
Planting time: All year
Aspect: Bright diffused light
Hardiness: Tropical
Difficulty: Moderate to difficult
Cultivation
The most important considerations when cultivating airplants are their requirements for air, light, water and warmth. Plants can be placed outside in the summer in the UK to benefit from the brighter conditions, rainfall and increased humidity. Return them under glass or bring indoors in early autumn.
Tillandsia have leaves coated in specialised water-absorbent cells called trichomes which in some species are so dense they give the plants a silvery, frosted appearance. The trichomes are their primary method of obtaining moisture from rainfall or fog.
Airplants are often grown on gnarled wood, or shells and rocks to which they are glued for support. The ornamental appearance of Tillandsia and their colourful, exotic-looking flowers make them intriguing and popular plants to grow in the home and conservatories.
Ventilation
Airplants have evolved in sites which all have superior airflow. It is therefore very important to provide a well-ventilated position for plants to remain healthy.
Light levels
Tillandsia enjoy bright but diffused light, so provide light shade from direct sunshine, particularly under glass. A position in a south-facing window behind a net curtain is ideal.
Watering and feeding
Although air plants are generally very easy plants to care for, watering tends to be the make or break factor. Don’t worry though! We have some tips and tricks to make it easy and simple.
What type of water to use?
In their natural habitat, air plants get their nutrients from rain water, bird droppings, and dying bugs. If you can collect rainwater, this would be the best option, or if you have access to pond, creek, lake, or well water.
If not, the next best option is spring water.
You don’t want to use tap water or filtered water. City tap water tends to have less minerals and more chemicals. Filtered water has been stripped of many of the natural minerals and nutrients that are beneficial to air plants.
To soak or to mist?
It is best to soak your air plants for 20 minutes to an hour every week to 10 days, with a supplemental misting depending on current climate and time of year. The water should be lukewarm, as cold or hot water will shock the air plants. If you decide to solely mist your air plants, make sure to do this about once a day, less or more when needed. When you mist your plants, make sure to spray all of the leaves enough to wet them, but not to the point that they are dripping.
After a soaking or misting, it is extremely important to make sure your air plants can completely dry, especially before placing them back into a terrarium or container. To ensure your air plants dry, place them in some indirect sunlight. You can place them upside down on top of a towel to let the water drip down the leaves, similar to drying a cup. Allow a few hours for the plant to fully dry, as air plants are very susceptible to rotting if they are left wet too long.
The hardest part about watering is understanding that what your air plant needs depends largely on its environment, and we’re here to help!
What time of year is it? Are you running your heater often? Do you live in a humid or drier climate?
These are all factors that can help you better determine how much water your air plants need. If you live in a drier climate, your plant will need to be watered more frequently than if you live somewhere with more humidity.
Watering can also depend on the time of year. During summer, the air is hotter and dryer, so you will need to water more. During Winter, your air plants will need a little less water because it will be cooler and more humid. Although if you are running a heater or using a fireplace, this will dry the air a little bit as well.
Follow these simple tips and tricks, and your air plants will thrive.
Another Watering Opinion:
Spraying them once a day (or more) is very unnecessary, no matter the climate. Also, tap water is fine as long as you allow the chlorine to evaporate before using it. Just store it in an open bucket for a few days. No need to collect rainwater or hike out to a lake or pond or spend a fortune BUYING water for your plants. Tillandsias are simply not that fragile.
I live in an inland valley in California, where it gets pretty hot and dry in the summer, and breezy and cold in the winter. So I’m either running a gas furnace or an air conditioner. My whole tillandsia collection is indoors. I water once per week by misting with “aged” tap water that is alkaline (8.1-8.4). I add a pinch of Epiphytes Delight to each refill of my spray bottle. All plants are doing wonderfully….. flowers and offsets!
Transitioning Your Air Plants from Winter to Summer
As the winter months come to an end and the weather gets warmer, you have the opportunity to bring your plants outside for a summer vacation! Air plants are from tropical climates so they love the warmer weather. Summer weather is great for air plants as more moisture comes back into the air, temperatures get warmer, and the sun shines brighter.
To help make the transition for your air plants as smooth and gentle as possible, we have a few important tips for you:
Do not leave them in direct sunlight.
Be sure you place your plants in a spot that they are getting indirect sunlight. Too much direct sunlight can burn your plant, causing the leaves to dry and wither, and can eventually kill them. If you find that one of your air plants is getting too much sun, remove it from its current location and try to find a better, shaded spot. If any leaves have dried or withered, you can use a pair of clean scissors or small gardening shears to cut off the dead and damaged parts of the leaves.
Putting them on your lanai or porch is a great option, as they will be covered from direct light, but they will still get the sunlight they need. Your air plants can also be attached to to trees or other plants that have branches or leaves to shade them-- you can tie them with string onto branches or placing them in between the base of a branch and the trunk works nicely. Remember that they will not harm your trees or plants, but they might root to the host if left long enough. This might cause difficulty when it’s time to bring your air plants inside again, so just keep an eye on them! If you are worried about your plants rooting to a tree, you can always place them in a terrarium or container and hang that from the branch of a tree.
Air circulation is important.
Be sure to never plant your air plants in soil because they do not take in nutrients through their roots, they absorb everything they need through their leaves. If you would like to put them in a container or terrarium, just make sure that the container doesn’t block the air circulation around any part of the plant and always remove the plant form the container to water.
Make sure to keep watering regularly.
Air plants left outside will still need to be watered regularly. Continue your soaking or misting regimen, and just keep in mind that the air may be a little more humid during summer months. Make sure to check on them at least once a week to ensure that they are happy and healthy in their new location. If your plant is getting too much sun or not enough water you can adjust accordingly before it’s too late.
Cut back on the fertilizer now that your air plants are outside because they will be getting natural fertilizer from birds, bugs, spiders, etc. If you notice they are looking unhappy during one of your inspections, you can soak them in a bath with a mild bromeliad fertilizer for an hour or more each month.
Hot Sun & Air Plants: How to Find the Happy Medium
As we have mentioned before, air plants do best with indirect sunlight. Too much sunlight will deplete the moisture from your air plants, and cause them to burn and eventually die if they are left in the sun too long. Air plant leaves are covered in tiny scales, properly called trichomes, that serve two major functions. First, they assist the plant in absorbing water and nutrients. Second, they help to reflect sunlight off of the leaf surface.
Generally, you want to keep all of your air plants out of direct sunlight as much as possible, however, some tillandsia can take more sun than others depending on the species of the plant and its environment. If your plant has thinner, wispier leaves, then it probably will not do too well in direct sunlight. Thicker, fuller leaves can hold moisture better so this type of air plant may better tolerate some direct sunlight for portions of the day. The air plant species that have silver leaves, such as xerographica, tend to do best handling direct sunlight.
If you live in a southern state or desert area where the sun is very strong, you should be very cautious with exposing your air plants to direct sunlight. Be especially careful in areas that lack humidity, like the desert, as your plants will damage and dry out from the direct sunlight even quicker.
If you keep your air plants indoors, we would recommend keeping them close to windows. They could also be kept near a window that is shaded, either from a tree or any other kind of protection from the direct sun. A lot of people also like to keep their air plants in an office with either indirect sunlight from windows, or bright fluorescent lighting.
If you keep your air plants outside, just follow the same guidelines, and be sure they are in an area the the sun won’t directly hit for more than an hour per day, or where they are shaded completely from direct sunlight. Under a tree or on your porch or lanai should work great!
Signs of sunburn include brown spots, dried out patches appearing on inside growth, and very unhealthy splotchy appearance of outside leaves where totally wet. If you notice any of these signs, immediately take the plant out of its current location and be prepared to do some light maintenance. Gently pull off the outside leaves that are totally damaged. If they do not remove easily, use a pair of scissors to trim off damaged areas. Now that you have removed the most damaged parts of the plant, give the air plant a good soaking before finding it a new spot that’s better out of the sun. Do not fertilize the air plant until it is completely healthy again, just continue with your watering schedule and add a few daily, light mistings. Don’t over soak as the plant can come apart if it stays wet for too long. Just be patient and consistent and your air plant should get back to its happy, healthy self in no time!
Everything you need to know about the nutritional needs of your air plants
Air plants have ingeniously evolved over time to store significant quantities of nutrients and moisture in the leaves of their plants. This makes them incredibly durable and very easy to look after.
If you provide your plants with access to sunlight and adequate water, then your plants are likely to receive most of the nutrients they need. This means they’re sure to be thriving in no time at all.
Air plants in the wild
Air plants are generally categorized as evolving from one of two distinct climate groups – Xeric climates and Mesic climates.
Xeric Tillandsia – like Harrissi, tend to live in dryer climates like the southern parts of the United States. They need less water to sustain themselves. These robust plants can normally be found in desert-like environments, often near a rock formation or mountain range.
Mesic Tillandsia – like Streptophylla, hail from wetter climates like South America and generally need more water to survive. These plants are used to regular rain, fog, and mist. Mesic Tillandsia can be found in more humid climates, like tropical forests.
As these types of environment can be vastly different from one another, species of Tillandsia have evolved in different ways.
Different air plant characteristics
Xeric and Mesic air plants both have similar features that make up their physical attributes – such as an epidermis and hypodermis that create the plant’s skin. However, Xeric Tillandsia has evolved with thicker leaves that are better equipped to store water in times of drought.
Mesic Tillandsia has developed over time with thinner leaves – as they have access to a more readily available supply of water.
The epidermis is the outside ‘skin’ that acts as a shield to the water-storing hypodermis. As Xeric plants are equipped to store more water than mesic plants, they tend to have a thicker hypodermis.
Most air plants that are produced for commercial use would fall within a ‘Xeric climate’ category.
Trichomes – The fuzzy white hairs on your plants
Xeric Tillandsia have more trichomes - the white, hair-like fibers on the plant’s leaves - than the Mesic variety. Trichomes take in nutrients from the air and rainfall. Whilst they look like fuzzy hairs, they’re actually tiny ‘cups’ that take in water.
Mesic Tillandsia have fewer trichomes than their Xeric cousins. These trichomes are also more spaced out on the plant’s leaves. This is because they rely on catching water and nutrients in their axils – the space between the leaves at the base of the plant.
The leaves of a Tillandsia have an array of amazing ‘vascular systems’ that act to transport nutrients and moisture throughout the plant. This further highlights the way in which these plants have evolved to exist in different environments.
What do they do with the food and water?
Just like other plants, Tillandsia needs energy to create new plant cells that make up the body of the plant. And how is this achieved? Through a process called Photosynthesis that converts substances like sunlight, water, C02 and minerals into energy.
This process really kicks into gear when active radiation is taken in through the plant’s skin cells and then converted to sugar. These sugars are broken down (much like in an animal’s body) and then used to energize the plant. It’s this ‘energy’ that is used to create new leaves and sustain the plant’s health.
Extra energy is needed for a plant to either bloom or reproduce. In commercial environments, or simply in your backyard at home, this process can be enhanced with a fertilizer.
What minerals do air plants need?
Air plants are always craving essential minerals like Potassium, Nitrogen, and Phosphorous - much like other plants. Regular fertilizers have these minerals, just not in the ideal ratio for air plants.
Fertilizer for air plants needs to be different than regular fertilizer because air plants cannot rely on soil to break down nitrogen.
There are Ammoniacal and Nitrate Nitrogens that can be consumed immediately by air plants. They do not need soil to break down their properties. Special fertilizers designed for Tillandsia have just the right amount of minerals that are ideal for air plants.
Where can I purchase air plant fertilizer?
There is a customized water-soluble fertilizer available for purchase that is perfect for air plants. This product has been developed by Tillandsia experts across North and South America.
This fertilizer has been shown to improve factors like pup production and blooming cycles. All you need to do is mix the correct ratio of fertilizer to water. The mix can then easily last you a few months. You may even choose to put your fertilizer mix in a spray bottle and spray your plants that way.
Finally, be sure to regularly spray the leaves of your plants and give them access to lots of sunshine. If your plants are not in a location where they’re getting natural rainfall, then make sure you give them plenty of water. This will ensure that your plants radiantly bloom and produce a healthy supply of pups.
Air Plant Pollination & Reproduction
Plants get pollinated and so do the air plants. You're probably wondering how this works for them. Well, in the rainforests they’re pollinated by birds, wind, and insects that come in contact with them. They can also self-pollinate, which is when there's a transfer of pollen from the stamen of a plant to its stigma.
In the tropical rainforests, bees, night moths, hummingbirds, and ants (generally referred to as pollinators) play the role of cross-pollinating an air plant with another of the same species during movement or feeding. This turns out quite helpful for the “self-incompatible’ Tillandsia species (T. caput-medusae and T. streptophylla) that can’t self-pollinate.
Today, we have hybrids of Tillandsia that have been exquisitely created through the cross-pollination of two different species by hybridizers. For example, T. Redy is a hybrid of T. Streptophylla X T. Concolor (developed by Mark Dimmitt) and T. John Arden's Art, a hybrid of T. intermedia X .T. capitata marron (developed by John Arden). Quite interesting, don’t you think?
After blooming, the cycle of life for the air plants continues and there's the production of seeds and offsets/pups as a result. For seed pods to be formed, the flowers need to be pollinated else your plants just end up growing offsets/pups alone. Hence, you shouldn't worry about pollinating your air plants as they don’t need it to grow pups.
Some air plants produce only one pup and some can produce up to ten pups. In some air plants species, the adult plant would produce a few generations of pups/offsets before dying, however many air plants species will bloom just once and hence, have just one generation of seeds or offsets/pups.
Flowers have generally adapted to possess bright colors and scents for attracting pollinators such as bees or hummingbirds to them. Besides species like the T. Diaguitensis, T. duratii, T. straminea and some others, most air plants lack scents but still make up for this with their bright colored flowers that come in handy in attracting pollinators to them.
Want to know if your air plants got pollinated? Simple, you’d notice seed pods forming in place of the flowers after blooming. These seed pods contain Tillandsia seeds encased in fluffy hairs that are known as COMA or parachute. Over time (which might be between three months to about two years), the seed pods would develop and the walls of the pod would split and release the seeds as a result. The COMA is designed to travel just like a parachute gliding through the air. Since they’re hairy and the hairs are very coarse, they’d find it easy to attach themselves to new plants, trees or rocks and start germinating in their new location.
In the wild, air plants produce seeds before the rainy season and would need to stay wet so as to start germinating and could die off in drought periods.
A lot of patience and prudence is needed when it comes to growing air plants from seed stage, so enjoy the journey.
Why Air Plants Don't Need Soil
Like all plants, air plants have leaves, roots, and bloom but don't need soil to grow. Why? That's because air plants, aka Tillandsia, come from the family of epiphytes and this means, instead of growing from the soil, they anchor themselves to other plants without being parasitic or causing harm. You're likely to find them on tree trunks in tropical rainforests as the tree’s canopy shades them from the sun, giving them filtered sunlight exposure.
An air plant's roots are meant for anchorage to another plant and not for absorbing nutrients or water like soil-needy plants. So, how do they survive? Well, these plants have trichomes (tiny scales) on their leaves for nutrients and water absorption.
In a tropical rainforest that’s densely populated, there’s usually a harsh competition for light, air, nutrients, and water. To exclude themselves from this competition, epiphytes have evolved over the years and now have their root systems in the air causing them to adapt perfectly and live in a harsh environment.
This is why air plants don't need soil to survive since they are epiphytes. Living on trees have granted them a higher place in the forest canopy. They’re able to get enough filtered sunlight in the tree's canopy without any need to compete with other trees and vines in the wild than they would have if they were to be living in the soil.
Now you ask, "If they don't need the roots, what do I do with them?" Well, without cutting the roots too close to the plants (to avoid damage), you could simply anchor or mount them onto any surface that you like for display. Something like a wreath or hanging planter isn’t a bad idea. They will have a pretty firm anchor over time and moderately strong wind can’t remove them.
Being a not soil-needy plant, an air plant would do just great being displayed anywhere. Yes, you're allowed to get creative or even send them as a gift to loved ones. As long as these plants get the needed filtered sunlight and good air circulation, you're good to go.
The Air Plant Blooming Process
Air plants start out as slow growers that need your patience, love and care to bloom.
Now you’re either asking one of these questions, “How do I make them bloom?'', "Is there a right way to nurture these air plants?” OR just waiting patiently for your Tillandsia to flower and wondering if you could do anything to hasten the process.
Sounds like you? Well, we got you covered...
Before Blooming
Let’s begin with some background check on the blooming process of air plants. Just like all flowering plants, they bloom at the beginning of their reproductive cycle. Here’s a fun fact for you; air plants bloom only once throughout their lifetime…amazing, right? They also produce different flowers which depend on their species. Most of these species produce beautiful flowers that come in diverse colors like pink, red, yellow and purple.
In the world of air plants, you’re sure to notice different bloom styles. For example, when the Capitata peach starts blooming, it’s pale pink in color with the flowers emerging from its center. In the case of the aeranthos and stricta, small buds tend to emerge from its center which later becomes larger and releases flowers when they open up. For some species, blooming lasts only a couple of days while others could last long up to some weeks.
Larger air plants like the caput-medusae and the xerographica have a longer cycle when it comes to blooming. They tend to grow large flower tracts known as “inflorescence” that can surprisingly be a foot tall or over for some species. The inflorescence contains the whole flower tracts which open up for the flowers to emerge with time. Some air plants have flower tracts that can last over a year.
After Blooming
After your air plants have completed their blooming cycle, you’re likely to notice ‘new growth’ off the sides, at the base or find them protected under leaves that are beginning to die off [so be careful when trimming your plants]. These are plantlets called “pups” which would mature later into adult air plants and repeat the growth cycle.
To hasten the growth stage after blooming, you can carefully cut off the flower tract that emerged from the air plant to quicken the offset stage. After blooming, air plants [depending on the species] would produce 1 to 3 offsets or pups on average. Once the offsets reach about 1/3 the size of the adult plant, you can snip them off or leave them [they would form a clump].
Making Your Air Plants Bloom
As long as your Tillandsia is healthy they would bloom in due time, this doesn't leave out the fact that they need to be cared for and have enough sunlight exposure for this to happen. You could also take advantage of diluted fertilizers to hasten the blooming process and the production of offsets or pups.
Nurturing Your Blooming Air Plants
We haven’t forgotten your million dollar question, “Is there a right way to nurture these air plants?” Well, first things first, don’t ever stop watering your air plants! As expected, your blooming air plants would need a little more water than usual as the energy is needed for the flower and the production of offsets or pups. Although, when it comes to watering, you need to be careful to not get the flower wet too. Why? Because having the flower soaked in water would cause it to wilt or rot.
So, instead of soaking up your air plant while it's blooming, you can mist using a spray bottle or hold under mildly running water to wet only the needed parts of the air plants.
It's important for your air plants to remain healthy and radiant, so, do well to look after them.
Even if your air plants haven’t started to bloom they’re still beautiful to behold, so relax and enjoy the journey.
Pruning
Most bromeliads including Tillandsia are monocarpic, meaning they grow to maturity, flower, set seed and then die, but not before producing offsets or young plants from the base. The mother plant once it has died completely, can be pruned away, leaving the offsets in situ to grow on; but pruning is not otherwise required.
Propagation
Offsets
Tillandsia are easily propagated by detaching offsets, although it is best to wait until the offsets have reached one third the size of the mother plant before doing so to ensure success. Once they have been detached they can be treated as for an adult plant.
Seed
Seeds of Tillandsia need warmth, moisture, light, and good air circulation for germination and survival;
Tillandsia usneoides (originating from Southern states of USA, C. America and South America): In the wild it grows in large silvery green festoons often several metres long, from branches of trees and even other inanimate structures such as telephone lines. Produces small yellowish green fragrant flowers.
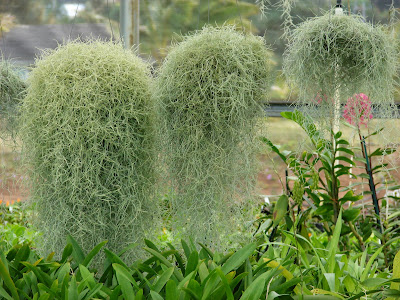
Due to its propensity for growing in subtropical humid southern locales like Alabama, Florida, Georgia, Louisiana, Mississippi, North Carolina, South Carolina, east and south Texas, and extreme southern Virginia, the plant is often associated with Southern Gothic imagery and Deep South culture.
One story of the origin of Spanish moss is called "The Meanest Man Who Ever Lived". The man's white hair grew very long and got caught on trees.
Spanish moss was introduced to Hawaii in the 19th century, and became a popular ornamental and lei plant. On Hawai'i it is often called "Pele's hair" after Pele the Hawaiian goddess. The term "Pele's hair" is also used to refer to a type of filamentous volcanic glass.

Spanish moss has been used for various purposes, including building insulation, mulch, packing material, mattress stuffing, and fiber. In the early 1900s it was used commercially in the padding of car seats.[18] In 1939 over 10,000 tons of processed Spanish-moss was produced.[19] It is still collected today in smaller quantities for use in arts and crafts, or for beddings for flower gardens, and as an ingredient in the traditional wall covering material bousillage. In some parts of Latin America and Louisiana Spanish moss is used in Nativity scenes.
In the desert regions of the southwestern United States, dried Spanish moss plants are sometimes used in the manufacture of evaporative coolers, colloquially known as swamp coolers (and in some areas as "desert coolers"). These are used to cool homes and offices much less expensively than using air conditioners. A pump squirts water onto a pad made of Spanish moss plants. A fan then pulls air through the pad and into the building. Evaporation of the water on the pads serves to reduce the air temperature, thus cooling the building.
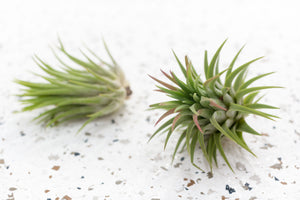
Tillandsia caput medusae (originating from C. America and Mexico): Produces silvery, sage-green linear leaves from a swollen bulb-like base. Purple flowers are produced on a reddish spike height 10-15cm (4-6in) spread 15cm (6in).

.jpg)
Tillandsia caput-medusae is a species of flowering plant in the bromeliad family, Bromeliaceae, subfamily Tillandsioideae. Common names include octopus plant and medusa's head. An epiphyte native to Central America and Mexico, T. caput-medusae is a commonly cultivated bromeliad species. The thick, channeled, tapering and twisting leaves are up to 25 cm (9.8 in) long and are covered in fine gray hairs. The rosette of leaves arise from an inflated pseudobulb. Pups are produced after blooming, as is usual with most Tillandsia species.
In a greenhouse, the plants can bloom from spring to early summer. The red inflorescences are usually unbranched or digitate. Bright violet flowers are about 3.2 cm (1.3 in) long with the stamens exerted.
Tillandsia caput-medusae does not have any free water retention in its overlapping leaves because its abaxial and adaxial leaf bases provides trichomes which coats the leaves. The significance of trichome is to enhance leaf permeability.
Tillandsia xerographica
(originating from C. America and southern Mexico): Produces silvery green leaves that turn blush-pink in bright light. Height and spread 20-25cm (8-9in).
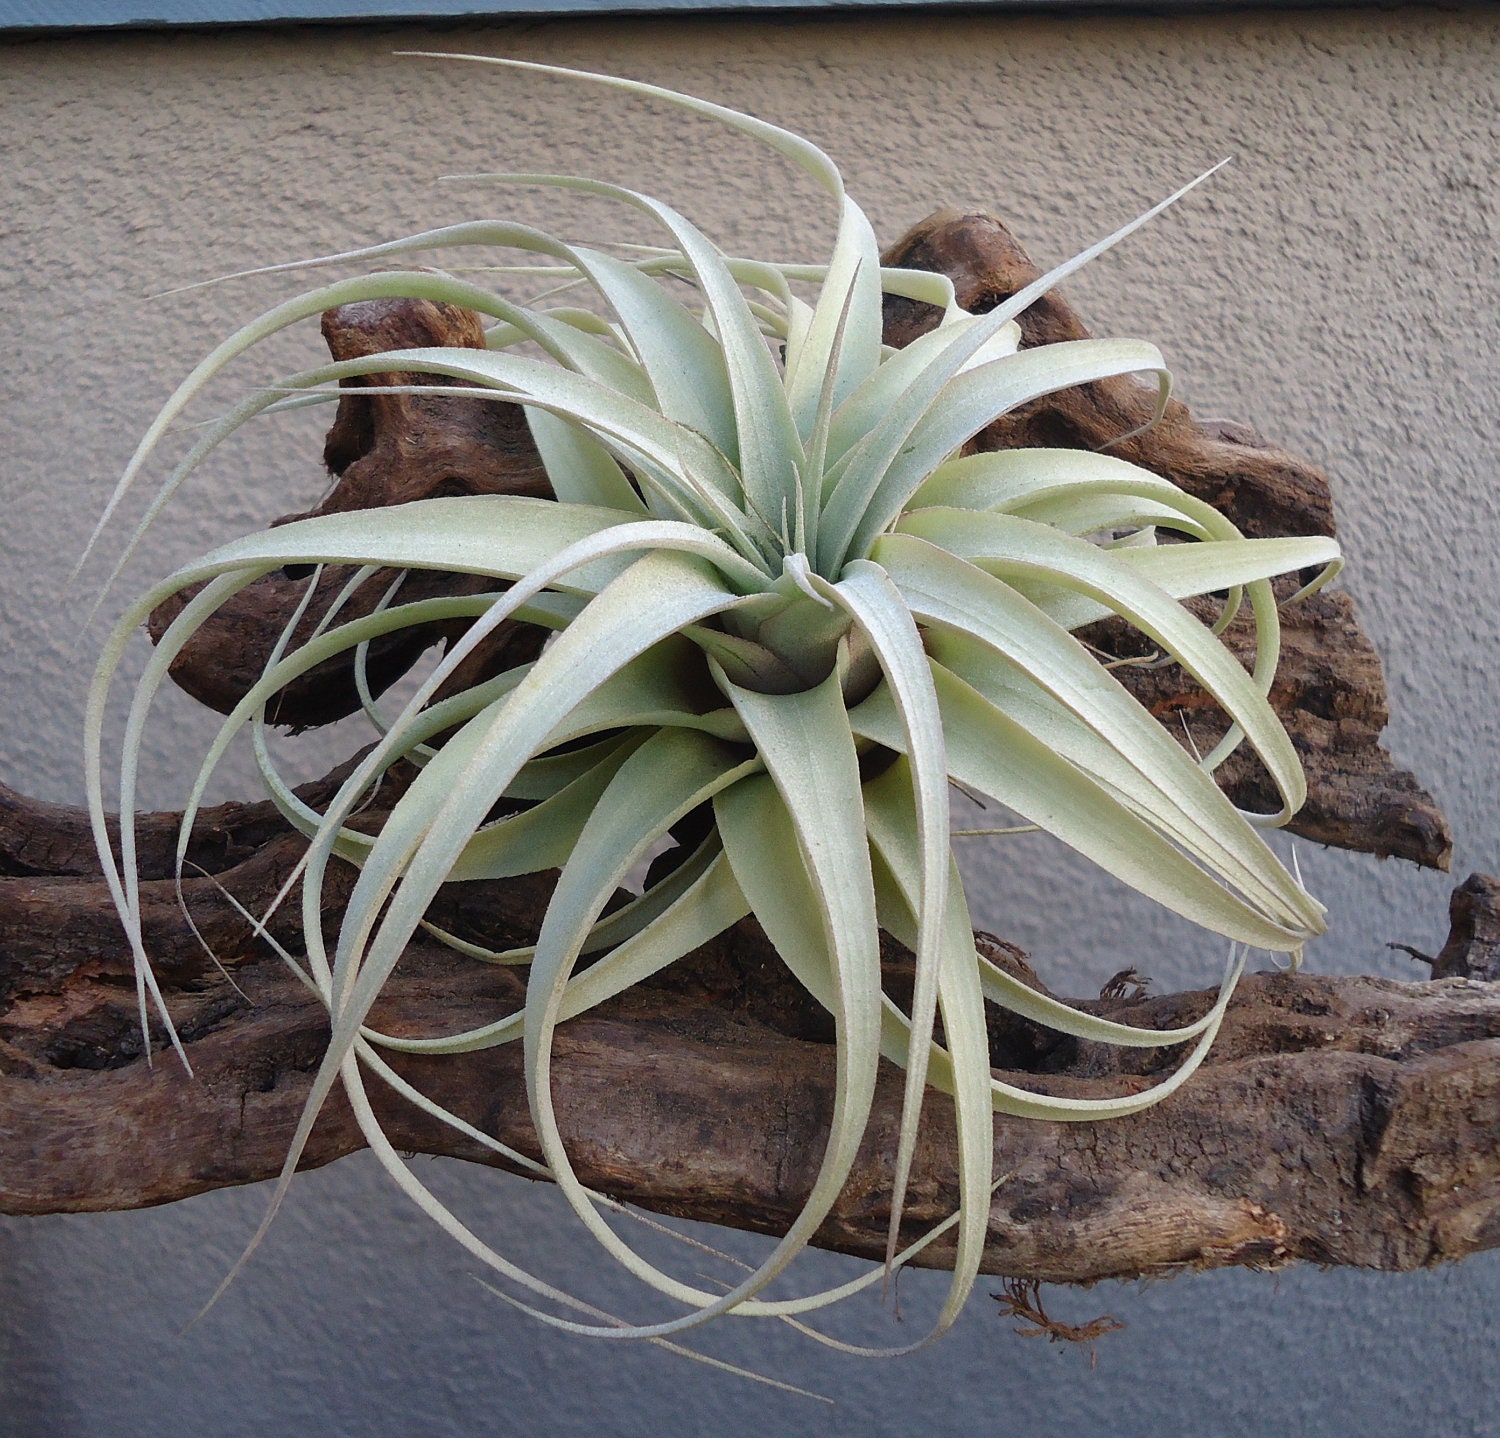
Tillandsia xerographica is a species of bromeliad that is native to southern Mexico, El Salvador, Guatemala and Honduras. The name is derived from the Greek words ξηρός (xeros), meaning "dry", and γραφία (graphia), meaning "writing". It is included in Tillandsia subg. Tillandsia.
Tillandsia xerographica is a slow-growing, xerophytic epiphyte.The silvery gray leaves are wide at the base and taper to a point making an attractive, sculptural rosette, 3 feet or more in diameter and over 3 feet high in flower. The inflorescence, on a thick, green stem, from 6 to 15 inches in height, densely branched. The leaf bracts are rosy red; the floral bracts are chartreuse; and the petals of the tubular flowers are red to purple and are very long lasting (months).
Tillandsia xerographica inhabits dry forests and thorn scrub at elevations of 140 to 600 m in southern Mexico, Guatemala and El Salvador. Average temperatures in its habitat range from 22 °C – 28 °C, with relative humidity between 60% to 72% and annual precipitation between 550 and 800 mm.[3] It grows epiphytically on the highest branches, where it receive intense lighting.
Problems
Rotting: Rot can cause the centre of the plant or some of the leaves to turn brown or black. It most usually occurs from water collecting in the crown of the plant, in conjunction with poor air circulation.
Dehydration: Dried out plants can occur as a combination of infrequent watering, high temperatures and low relative humidity. Plants can sometimes be revived by soaking overnight, but in the long term an adjustment to more favourable watering and growing procedures is required. Extended use of hard water instead of rainwater can also cause dehydration.
Shedding leaves: Loss of lower leaves is the result of stress such as from a change of conditions or water stress. This can also be an indication of rot (see above).
Brown or bleached leaves: This is usually the result of the plant overheating under glass in direct sunlight, and low relative humidity, causing the foliage to scorch. Provide more shading and raise the humidity around the plants to correct this problem.
Slugs and snails: These common pests can be a problem on the plants especially if they have been placed outside for the summer.
I've used the images found on AirplantCity to identify the airplants I currently have.
Tillandsia Ionantha Rubra
Abdita Brachycalous

Tillandsia Harrisii

https://www.rhs.org.uk/advice/profile?pid=971
https://en.wikipedia.org/wiki/Spanish_moss
https://en.wikipedia.org/wiki/Tillandsia_caput-medusae
https://en.wikipedia.org/wiki/Tillandsia_xerographica
https://www.airplantcity.com/
Air plants
Air plants (Tillandsia spp.) are from Mexico and South America. They are so-named because they use their short, wiry roots to attach themselves to branches, cliff-faces, even electricity and telephone lines, rather than rooting in soil.
Quick facts
Common name: Air plant
Botanical name: Tillandsia spp.
Group: Tropical epiphytes (growing on the branches or trunks of host trees without parasitizing them) or lithophytes (growing on rocks)
Flowering time: Spring to autumn
Planting time: All year
Aspect: Bright diffused light
Hardiness: Tropical
Difficulty: Moderate to difficult
Cultivation
The most important considerations when cultivating airplants are their requirements for air, light, water and warmth. Plants can be placed outside in the summer in the UK to benefit from the brighter conditions, rainfall and increased humidity. Return them under glass or bring indoors in early autumn.
Tillandsia have leaves coated in specialised water-absorbent cells called trichomes which in some species are so dense they give the plants a silvery, frosted appearance. The trichomes are their primary method of obtaining moisture from rainfall or fog.
Airplants are often grown on gnarled wood, or shells and rocks to which they are glued for support. The ornamental appearance of Tillandsia and their colourful, exotic-looking flowers make them intriguing and popular plants to grow in the home and conservatories.
Ventilation
Airplants have evolved in sites which all have superior airflow. It is therefore very important to provide a well-ventilated position for plants to remain healthy.
Light levels
Tillandsia enjoy bright but diffused light, so provide light shade from direct sunshine, particularly under glass. A position in a south-facing window behind a net curtain is ideal.
Watering and feeding
- From spring until autumn, immerse plants in rainwater on average two to three times a week, allowing them to dry off in between
- Avoid using tapwater especially in hard water areas as the water contains dissolved sodium bicarbonate which can precipitate out on the trichomes and block them, preventing the Tillandsia from absorbing moisture and nutrients
- In higher temperatures and low atmospheric humidity, watering may be required more frequently; less often in cooler, humid conditions
- Misting plants in-between immersing them can help to prevent dehydration in warm conditions, but does not provide sufficient moisture alone so should not be used instead of immersion
- Avoid watering plants if temperatures drop to 12ºC (54ºF) as they can remain wet for too long
- In summer, plants can occasionally be left to soak overnight in water to which some fertiliser suitable for orchids has been added. This will ensure they are fully hydrated and able to absorb the fertiliser. Tillandsia will not tolerate being kept in water for longer periods or being kept continuously wet
- Allowing plants to dry off in between watering is very important for good plant health
- Plants should be angled facing downwards when mounted, to allow water to drain out of the centre or crown of the plant, or gently shaken after watering to dislodge any water droplets
- Temperature
- Plants do best if the temperature does not drop below 12°C (54°F) and can tolerate a maximum of 30°C (86°F) if relative humidity is high.
Although air plants are generally very easy plants to care for, watering tends to be the make or break factor. Don’t worry though! We have some tips and tricks to make it easy and simple.
What type of water to use?
In their natural habitat, air plants get their nutrients from rain water, bird droppings, and dying bugs. If you can collect rainwater, this would be the best option, or if you have access to pond, creek, lake, or well water.
If not, the next best option is spring water.
You don’t want to use tap water or filtered water. City tap water tends to have less minerals and more chemicals. Filtered water has been stripped of many of the natural minerals and nutrients that are beneficial to air plants.
To soak or to mist?
It is best to soak your air plants for 20 minutes to an hour every week to 10 days, with a supplemental misting depending on current climate and time of year. The water should be lukewarm, as cold or hot water will shock the air plants. If you decide to solely mist your air plants, make sure to do this about once a day, less or more when needed. When you mist your plants, make sure to spray all of the leaves enough to wet them, but not to the point that they are dripping.
After a soaking or misting, it is extremely important to make sure your air plants can completely dry, especially before placing them back into a terrarium or container. To ensure your air plants dry, place them in some indirect sunlight. You can place them upside down on top of a towel to let the water drip down the leaves, similar to drying a cup. Allow a few hours for the plant to fully dry, as air plants are very susceptible to rotting if they are left wet too long.
The hardest part about watering is understanding that what your air plant needs depends largely on its environment, and we’re here to help!
What time of year is it? Are you running your heater often? Do you live in a humid or drier climate?
These are all factors that can help you better determine how much water your air plants need. If you live in a drier climate, your plant will need to be watered more frequently than if you live somewhere with more humidity.
Watering can also depend on the time of year. During summer, the air is hotter and dryer, so you will need to water more. During Winter, your air plants will need a little less water because it will be cooler and more humid. Although if you are running a heater or using a fireplace, this will dry the air a little bit as well.
Follow these simple tips and tricks, and your air plants will thrive.
Another Watering Opinion:
Spraying them once a day (or more) is very unnecessary, no matter the climate. Also, tap water is fine as long as you allow the chlorine to evaporate before using it. Just store it in an open bucket for a few days. No need to collect rainwater or hike out to a lake or pond or spend a fortune BUYING water for your plants. Tillandsias are simply not that fragile.
I live in an inland valley in California, where it gets pretty hot and dry in the summer, and breezy and cold in the winter. So I’m either running a gas furnace or an air conditioner. My whole tillandsia collection is indoors. I water once per week by misting with “aged” tap water that is alkaline (8.1-8.4). I add a pinch of Epiphytes Delight to each refill of my spray bottle. All plants are doing wonderfully….. flowers and offsets!
Transitioning Your Air Plants from Winter to Summer
As the winter months come to an end and the weather gets warmer, you have the opportunity to bring your plants outside for a summer vacation! Air plants are from tropical climates so they love the warmer weather. Summer weather is great for air plants as more moisture comes back into the air, temperatures get warmer, and the sun shines brighter.
To help make the transition for your air plants as smooth and gentle as possible, we have a few important tips for you:
Do not leave them in direct sunlight.
Be sure you place your plants in a spot that they are getting indirect sunlight. Too much direct sunlight can burn your plant, causing the leaves to dry and wither, and can eventually kill them. If you find that one of your air plants is getting too much sun, remove it from its current location and try to find a better, shaded spot. If any leaves have dried or withered, you can use a pair of clean scissors or small gardening shears to cut off the dead and damaged parts of the leaves.
Putting them on your lanai or porch is a great option, as they will be covered from direct light, but they will still get the sunlight they need. Your air plants can also be attached to to trees or other plants that have branches or leaves to shade them-- you can tie them with string onto branches or placing them in between the base of a branch and the trunk works nicely. Remember that they will not harm your trees or plants, but they might root to the host if left long enough. This might cause difficulty when it’s time to bring your air plants inside again, so just keep an eye on them! If you are worried about your plants rooting to a tree, you can always place them in a terrarium or container and hang that from the branch of a tree.
Air circulation is important.
Be sure to never plant your air plants in soil because they do not take in nutrients through their roots, they absorb everything they need through their leaves. If you would like to put them in a container or terrarium, just make sure that the container doesn’t block the air circulation around any part of the plant and always remove the plant form the container to water.
Make sure to keep watering regularly.
Air plants left outside will still need to be watered regularly. Continue your soaking or misting regimen, and just keep in mind that the air may be a little more humid during summer months. Make sure to check on them at least once a week to ensure that they are happy and healthy in their new location. If your plant is getting too much sun or not enough water you can adjust accordingly before it’s too late.
Cut back on the fertilizer now that your air plants are outside because they will be getting natural fertilizer from birds, bugs, spiders, etc. If you notice they are looking unhappy during one of your inspections, you can soak them in a bath with a mild bromeliad fertilizer for an hour or more each month.
Hot Sun & Air Plants: How to Find the Happy Medium
As we have mentioned before, air plants do best with indirect sunlight. Too much sunlight will deplete the moisture from your air plants, and cause them to burn and eventually die if they are left in the sun too long. Air plant leaves are covered in tiny scales, properly called trichomes, that serve two major functions. First, they assist the plant in absorbing water and nutrients. Second, they help to reflect sunlight off of the leaf surface.
Generally, you want to keep all of your air plants out of direct sunlight as much as possible, however, some tillandsia can take more sun than others depending on the species of the plant and its environment. If your plant has thinner, wispier leaves, then it probably will not do too well in direct sunlight. Thicker, fuller leaves can hold moisture better so this type of air plant may better tolerate some direct sunlight for portions of the day. The air plant species that have silver leaves, such as xerographica, tend to do best handling direct sunlight.
If you live in a southern state or desert area where the sun is very strong, you should be very cautious with exposing your air plants to direct sunlight. Be especially careful in areas that lack humidity, like the desert, as your plants will damage and dry out from the direct sunlight even quicker.
If you keep your air plants indoors, we would recommend keeping them close to windows. They could also be kept near a window that is shaded, either from a tree or any other kind of protection from the direct sun. A lot of people also like to keep their air plants in an office with either indirect sunlight from windows, or bright fluorescent lighting.
If you keep your air plants outside, just follow the same guidelines, and be sure they are in an area the the sun won’t directly hit for more than an hour per day, or where they are shaded completely from direct sunlight. Under a tree or on your porch or lanai should work great!
Signs of sunburn include brown spots, dried out patches appearing on inside growth, and very unhealthy splotchy appearance of outside leaves where totally wet. If you notice any of these signs, immediately take the plant out of its current location and be prepared to do some light maintenance. Gently pull off the outside leaves that are totally damaged. If they do not remove easily, use a pair of scissors to trim off damaged areas. Now that you have removed the most damaged parts of the plant, give the air plant a good soaking before finding it a new spot that’s better out of the sun. Do not fertilize the air plant until it is completely healthy again, just continue with your watering schedule and add a few daily, light mistings. Don’t over soak as the plant can come apart if it stays wet for too long. Just be patient and consistent and your air plant should get back to its happy, healthy self in no time!
Everything you need to know about the nutritional needs of your air plants
Air plants have ingeniously evolved over time to store significant quantities of nutrients and moisture in the leaves of their plants. This makes them incredibly durable and very easy to look after.
If you provide your plants with access to sunlight and adequate water, then your plants are likely to receive most of the nutrients they need. This means they’re sure to be thriving in no time at all.
Air plants in the wild
Air plants are generally categorized as evolving from one of two distinct climate groups – Xeric climates and Mesic climates.
Xeric Tillandsia – like Harrissi, tend to live in dryer climates like the southern parts of the United States. They need less water to sustain themselves. These robust plants can normally be found in desert-like environments, often near a rock formation or mountain range.
Mesic Tillandsia – like Streptophylla, hail from wetter climates like South America and generally need more water to survive. These plants are used to regular rain, fog, and mist. Mesic Tillandsia can be found in more humid climates, like tropical forests.
As these types of environment can be vastly different from one another, species of Tillandsia have evolved in different ways.
Different air plant characteristics
Xeric and Mesic air plants both have similar features that make up their physical attributes – such as an epidermis and hypodermis that create the plant’s skin. However, Xeric Tillandsia has evolved with thicker leaves that are better equipped to store water in times of drought.
Mesic Tillandsia has developed over time with thinner leaves – as they have access to a more readily available supply of water.
The epidermis is the outside ‘skin’ that acts as a shield to the water-storing hypodermis. As Xeric plants are equipped to store more water than mesic plants, they tend to have a thicker hypodermis.
Most air plants that are produced for commercial use would fall within a ‘Xeric climate’ category.
Trichomes – The fuzzy white hairs on your plants
Xeric Tillandsia have more trichomes - the white, hair-like fibers on the plant’s leaves - than the Mesic variety. Trichomes take in nutrients from the air and rainfall. Whilst they look like fuzzy hairs, they’re actually tiny ‘cups’ that take in water.
Mesic Tillandsia have fewer trichomes than their Xeric cousins. These trichomes are also more spaced out on the plant’s leaves. This is because they rely on catching water and nutrients in their axils – the space between the leaves at the base of the plant.
The leaves of a Tillandsia have an array of amazing ‘vascular systems’ that act to transport nutrients and moisture throughout the plant. This further highlights the way in which these plants have evolved to exist in different environments.
What do they do with the food and water?
Just like other plants, Tillandsia needs energy to create new plant cells that make up the body of the plant. And how is this achieved? Through a process called Photosynthesis that converts substances like sunlight, water, C02 and minerals into energy.
This process really kicks into gear when active radiation is taken in through the plant’s skin cells and then converted to sugar. These sugars are broken down (much like in an animal’s body) and then used to energize the plant. It’s this ‘energy’ that is used to create new leaves and sustain the plant’s health.
Extra energy is needed for a plant to either bloom or reproduce. In commercial environments, or simply in your backyard at home, this process can be enhanced with a fertilizer.
What minerals do air plants need?
Air plants are always craving essential minerals like Potassium, Nitrogen, and Phosphorous - much like other plants. Regular fertilizers have these minerals, just not in the ideal ratio for air plants.
Fertilizer for air plants needs to be different than regular fertilizer because air plants cannot rely on soil to break down nitrogen.
There are Ammoniacal and Nitrate Nitrogens that can be consumed immediately by air plants. They do not need soil to break down their properties. Special fertilizers designed for Tillandsia have just the right amount of minerals that are ideal for air plants.
Where can I purchase air plant fertilizer?
There is a customized water-soluble fertilizer available for purchase that is perfect for air plants. This product has been developed by Tillandsia experts across North and South America.
This fertilizer has been shown to improve factors like pup production and blooming cycles. All you need to do is mix the correct ratio of fertilizer to water. The mix can then easily last you a few months. You may even choose to put your fertilizer mix in a spray bottle and spray your plants that way.
Finally, be sure to regularly spray the leaves of your plants and give them access to lots of sunshine. If your plants are not in a location where they’re getting natural rainfall, then make sure you give them plenty of water. This will ensure that your plants radiantly bloom and produce a healthy supply of pups.
Air Plant Pollination & Reproduction
Plants get pollinated and so do the air plants. You're probably wondering how this works for them. Well, in the rainforests they’re pollinated by birds, wind, and insects that come in contact with them. They can also self-pollinate, which is when there's a transfer of pollen from the stamen of a plant to its stigma.
In the tropical rainforests, bees, night moths, hummingbirds, and ants (generally referred to as pollinators) play the role of cross-pollinating an air plant with another of the same species during movement or feeding. This turns out quite helpful for the “self-incompatible’ Tillandsia species (T. caput-medusae and T. streptophylla) that can’t self-pollinate.
Today, we have hybrids of Tillandsia that have been exquisitely created through the cross-pollination of two different species by hybridizers. For example, T. Redy is a hybrid of T. Streptophylla X T. Concolor (developed by Mark Dimmitt) and T. John Arden's Art, a hybrid of T. intermedia X .T. capitata marron (developed by John Arden). Quite interesting, don’t you think?
After blooming, the cycle of life for the air plants continues and there's the production of seeds and offsets/pups as a result. For seed pods to be formed, the flowers need to be pollinated else your plants just end up growing offsets/pups alone. Hence, you shouldn't worry about pollinating your air plants as they don’t need it to grow pups.
Some air plants produce only one pup and some can produce up to ten pups. In some air plants species, the adult plant would produce a few generations of pups/offsets before dying, however many air plants species will bloom just once and hence, have just one generation of seeds or offsets/pups.
Flowers have generally adapted to possess bright colors and scents for attracting pollinators such as bees or hummingbirds to them. Besides species like the T. Diaguitensis, T. duratii, T. straminea and some others, most air plants lack scents but still make up for this with their bright colored flowers that come in handy in attracting pollinators to them.
Want to know if your air plants got pollinated? Simple, you’d notice seed pods forming in place of the flowers after blooming. These seed pods contain Tillandsia seeds encased in fluffy hairs that are known as COMA or parachute. Over time (which might be between three months to about two years), the seed pods would develop and the walls of the pod would split and release the seeds as a result. The COMA is designed to travel just like a parachute gliding through the air. Since they’re hairy and the hairs are very coarse, they’d find it easy to attach themselves to new plants, trees or rocks and start germinating in their new location.
In the wild, air plants produce seeds before the rainy season and would need to stay wet so as to start germinating and could die off in drought periods.
A lot of patience and prudence is needed when it comes to growing air plants from seed stage, so enjoy the journey.
Why Air Plants Don't Need Soil
Like all plants, air plants have leaves, roots, and bloom but don't need soil to grow. Why? That's because air plants, aka Tillandsia, come from the family of epiphytes and this means, instead of growing from the soil, they anchor themselves to other plants without being parasitic or causing harm. You're likely to find them on tree trunks in tropical rainforests as the tree’s canopy shades them from the sun, giving them filtered sunlight exposure.
An air plant's roots are meant for anchorage to another plant and not for absorbing nutrients or water like soil-needy plants. So, how do they survive? Well, these plants have trichomes (tiny scales) on their leaves for nutrients and water absorption.
In a tropical rainforest that’s densely populated, there’s usually a harsh competition for light, air, nutrients, and water. To exclude themselves from this competition, epiphytes have evolved over the years and now have their root systems in the air causing them to adapt perfectly and live in a harsh environment.
This is why air plants don't need soil to survive since they are epiphytes. Living on trees have granted them a higher place in the forest canopy. They’re able to get enough filtered sunlight in the tree's canopy without any need to compete with other trees and vines in the wild than they would have if they were to be living in the soil.
Now you ask, "If they don't need the roots, what do I do with them?" Well, without cutting the roots too close to the plants (to avoid damage), you could simply anchor or mount them onto any surface that you like for display. Something like a wreath or hanging planter isn’t a bad idea. They will have a pretty firm anchor over time and moderately strong wind can’t remove them.
Being a not soil-needy plant, an air plant would do just great being displayed anywhere. Yes, you're allowed to get creative or even send them as a gift to loved ones. As long as these plants get the needed filtered sunlight and good air circulation, you're good to go.
The Air Plant Blooming Process
Air plants start out as slow growers that need your patience, love and care to bloom.
Now you’re either asking one of these questions, “How do I make them bloom?'', "Is there a right way to nurture these air plants?” OR just waiting patiently for your Tillandsia to flower and wondering if you could do anything to hasten the process.
Sounds like you? Well, we got you covered...
Before Blooming
Let’s begin with some background check on the blooming process of air plants. Just like all flowering plants, they bloom at the beginning of their reproductive cycle. Here’s a fun fact for you; air plants bloom only once throughout their lifetime…amazing, right? They also produce different flowers which depend on their species. Most of these species produce beautiful flowers that come in diverse colors like pink, red, yellow and purple.
In the world of air plants, you’re sure to notice different bloom styles. For example, when the Capitata peach starts blooming, it’s pale pink in color with the flowers emerging from its center. In the case of the aeranthos and stricta, small buds tend to emerge from its center which later becomes larger and releases flowers when they open up. For some species, blooming lasts only a couple of days while others could last long up to some weeks.
Larger air plants like the caput-medusae and the xerographica have a longer cycle when it comes to blooming. They tend to grow large flower tracts known as “inflorescence” that can surprisingly be a foot tall or over for some species. The inflorescence contains the whole flower tracts which open up for the flowers to emerge with time. Some air plants have flower tracts that can last over a year.
After Blooming
After your air plants have completed their blooming cycle, you’re likely to notice ‘new growth’ off the sides, at the base or find them protected under leaves that are beginning to die off [so be careful when trimming your plants]. These are plantlets called “pups” which would mature later into adult air plants and repeat the growth cycle.
To hasten the growth stage after blooming, you can carefully cut off the flower tract that emerged from the air plant to quicken the offset stage. After blooming, air plants [depending on the species] would produce 1 to 3 offsets or pups on average. Once the offsets reach about 1/3 the size of the adult plant, you can snip them off or leave them [they would form a clump].
Making Your Air Plants Bloom
As long as your Tillandsia is healthy they would bloom in due time, this doesn't leave out the fact that they need to be cared for and have enough sunlight exposure for this to happen. You could also take advantage of diluted fertilizers to hasten the blooming process and the production of offsets or pups.
Nurturing Your Blooming Air Plants
We haven’t forgotten your million dollar question, “Is there a right way to nurture these air plants?” Well, first things first, don’t ever stop watering your air plants! As expected, your blooming air plants would need a little more water than usual as the energy is needed for the flower and the production of offsets or pups. Although, when it comes to watering, you need to be careful to not get the flower wet too. Why? Because having the flower soaked in water would cause it to wilt or rot.
So, instead of soaking up your air plant while it's blooming, you can mist using a spray bottle or hold under mildly running water to wet only the needed parts of the air plants.
It's important for your air plants to remain healthy and radiant, so, do well to look after them.
Even if your air plants haven’t started to bloom they’re still beautiful to behold, so relax and enjoy the journey.
Pruning
Most bromeliads including Tillandsia are monocarpic, meaning they grow to maturity, flower, set seed and then die, but not before producing offsets or young plants from the base. The mother plant once it has died completely, can be pruned away, leaving the offsets in situ to grow on; but pruning is not otherwise required.
Propagation
Offsets
Tillandsia are easily propagated by detaching offsets, although it is best to wait until the offsets have reached one third the size of the mother plant before doing so to ensure success. Once they have been detached they can be treated as for an adult plant.
Seed
Seeds of Tillandsia need warmth, moisture, light, and good air circulation for germination and survival;
- Old tights or stockings stretched over a wire frame, or chunks of tree fern fibre can be used as a substrate for germination
- Spread the seeds thinly so that they have plenty of space and are not touching as this helps when moving them on without damaging them once they have reached manageable size, as well as enabling the seedlings to grow larger
- Keep in strong but diffused light, good air circulation, high humidity and a temperature of approx. 25°C (75°F) for germination
- For the first two years or so, the plants require the same growing conditions as for germination
- Water by misting heavily whenever the surfaces of the young plants appear dry
- Feed weekly with an orchid feed or a regular liquid feed at one quarter strength
- Avoid keeping the substrate too moist as this will cause development of algae that can suffocate the young plants
- Once the plants have reached 1.25cm (½in) in height, they are ready to be separated onto individual pieces of substrate to grow on to flower
Tillandsia usneoides (originating from Southern states of USA, C. America and South America): In the wild it grows in large silvery green festoons often several metres long, from branches of trees and even other inanimate structures such as telephone lines. Produces small yellowish green fragrant flowers.
Due to its propensity for growing in subtropical humid southern locales like Alabama, Florida, Georgia, Louisiana, Mississippi, North Carolina, South Carolina, east and south Texas, and extreme southern Virginia, the plant is often associated with Southern Gothic imagery and Deep South culture.
One story of the origin of Spanish moss is called "The Meanest Man Who Ever Lived". The man's white hair grew very long and got caught on trees.
Spanish moss was introduced to Hawaii in the 19th century, and became a popular ornamental and lei plant. On Hawai'i it is often called "Pele's hair" after Pele the Hawaiian goddess. The term "Pele's hair" is also used to refer to a type of filamentous volcanic glass.
Spanish moss has been used for various purposes, including building insulation, mulch, packing material, mattress stuffing, and fiber. In the early 1900s it was used commercially in the padding of car seats.[18] In 1939 over 10,000 tons of processed Spanish-moss was produced.[19] It is still collected today in smaller quantities for use in arts and crafts, or for beddings for flower gardens, and as an ingredient in the traditional wall covering material bousillage. In some parts of Latin America and Louisiana Spanish moss is used in Nativity scenes.
In the desert regions of the southwestern United States, dried Spanish moss plants are sometimes used in the manufacture of evaporative coolers, colloquially known as swamp coolers (and in some areas as "desert coolers"). These are used to cool homes and offices much less expensively than using air conditioners. A pump squirts water onto a pad made of Spanish moss plants. A fan then pulls air through the pad and into the building. Evaporation of the water on the pads serves to reduce the air temperature, thus cooling the building.
Tillandsia caput medusae (originating from C. America and Mexico): Produces silvery, sage-green linear leaves from a swollen bulb-like base. Purple flowers are produced on a reddish spike height 10-15cm (4-6in) spread 15cm (6in).
Tillandsia caput-medusae is a species of flowering plant in the bromeliad family, Bromeliaceae, subfamily Tillandsioideae. Common names include octopus plant and medusa's head. An epiphyte native to Central America and Mexico, T. caput-medusae is a commonly cultivated bromeliad species. The thick, channeled, tapering and twisting leaves are up to 25 cm (9.8 in) long and are covered in fine gray hairs. The rosette of leaves arise from an inflated pseudobulb. Pups are produced after blooming, as is usual with most Tillandsia species.
In a greenhouse, the plants can bloom from spring to early summer. The red inflorescences are usually unbranched or digitate. Bright violet flowers are about 3.2 cm (1.3 in) long with the stamens exerted.
Tillandsia caput-medusae does not have any free water retention in its overlapping leaves because its abaxial and adaxial leaf bases provides trichomes which coats the leaves. The significance of trichome is to enhance leaf permeability.
Tillandsia xerographica
(originating from C. America and southern Mexico): Produces silvery green leaves that turn blush-pink in bright light. Height and spread 20-25cm (8-9in).
Tillandsia xerographica is a species of bromeliad that is native to southern Mexico, El Salvador, Guatemala and Honduras. The name is derived from the Greek words ξηρός (xeros), meaning "dry", and γραφία (graphia), meaning "writing". It is included in Tillandsia subg. Tillandsia.
Tillandsia xerographica is a slow-growing, xerophytic epiphyte.The silvery gray leaves are wide at the base and taper to a point making an attractive, sculptural rosette, 3 feet or more in diameter and over 3 feet high in flower. The inflorescence, on a thick, green stem, from 6 to 15 inches in height, densely branched. The leaf bracts are rosy red; the floral bracts are chartreuse; and the petals of the tubular flowers are red to purple and are very long lasting (months).
Tillandsia xerographica inhabits dry forests and thorn scrub at elevations of 140 to 600 m in southern Mexico, Guatemala and El Salvador. Average temperatures in its habitat range from 22 °C – 28 °C, with relative humidity between 60% to 72% and annual precipitation between 550 and 800 mm.[3] It grows epiphytically on the highest branches, where it receive intense lighting.
Problems
Rotting: Rot can cause the centre of the plant or some of the leaves to turn brown or black. It most usually occurs from water collecting in the crown of the plant, in conjunction with poor air circulation.
Dehydration: Dried out plants can occur as a combination of infrequent watering, high temperatures and low relative humidity. Plants can sometimes be revived by soaking overnight, but in the long term an adjustment to more favourable watering and growing procedures is required. Extended use of hard water instead of rainwater can also cause dehydration.
Shedding leaves: Loss of lower leaves is the result of stress such as from a change of conditions or water stress. This can also be an indication of rot (see above).
Brown or bleached leaves: This is usually the result of the plant overheating under glass in direct sunlight, and low relative humidity, causing the foliage to scorch. Provide more shading and raise the humidity around the plants to correct this problem.
Slugs and snails: These common pests can be a problem on the plants especially if they have been placed outside for the summer.
I've used the images found on AirplantCity to identify the airplants I currently have.
Tillandsia Ionantha Rubra
Abdita Brachycalous
Tillandsia Harrisii
Σχόλια
Δημοσίευση σχολίου